Tuesday, October 4, 2016

OWASP Dependency Check CLI - Analyzing Vulnerabilities in 3rd Party Libraries

When developing software, we have to use 3rd party libraries in many cases. For example, if we want to send an email from our application, we would use a well known email sending library like apache.commons.email. If we want to make an HTTP call to an external website or an API,  from our application we would use the httpclient library of apache. However before using a 3rd party library, it is important to check if there are any known security vulnerabilities reported against these libraries. For that, you can search in the National Vulnerability Database [1] and make sure it is safe to use the library in your application. However, it is difficult to do this manually when you have many external dependencies in your application. In such case, you can use a tool to do the search for you. OWASP Dependency Check  [2] is an example for this which I am going to explain in this blog post.

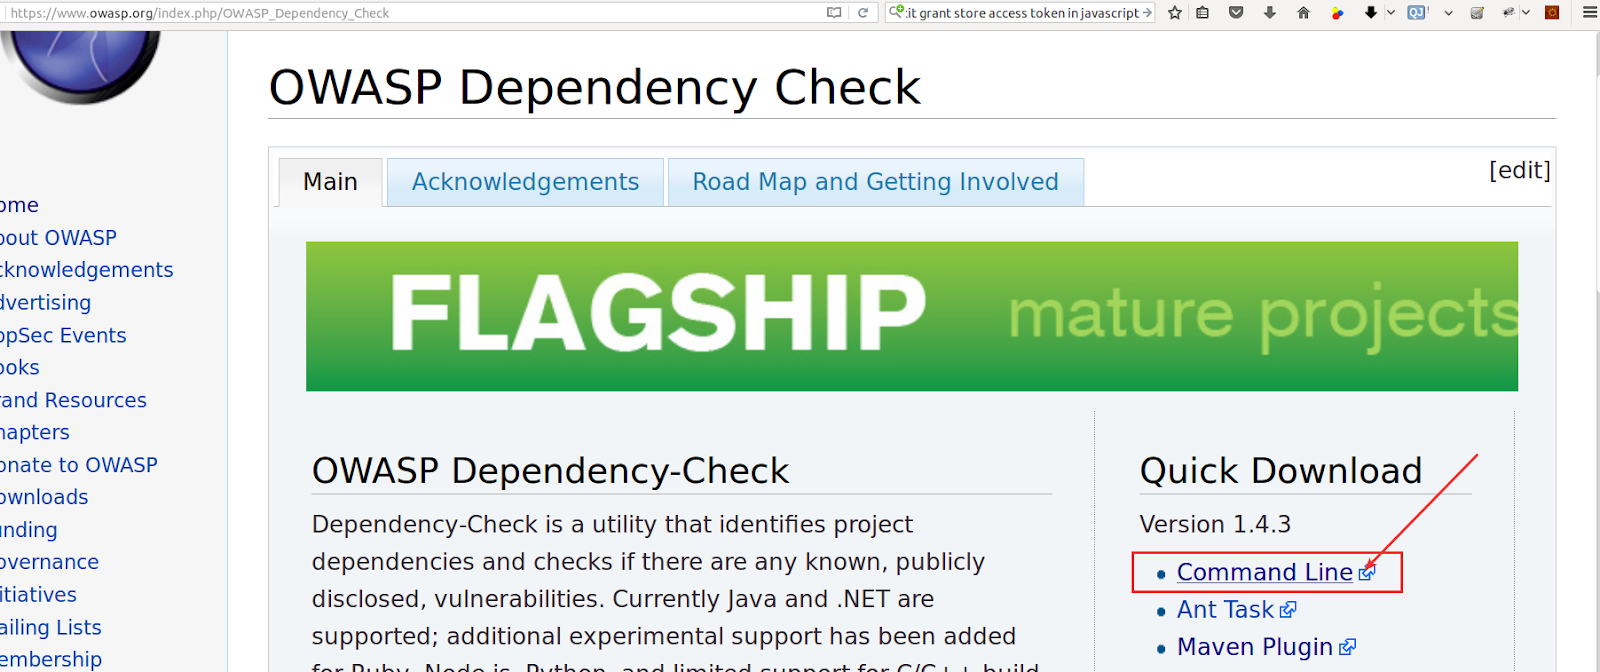
Here I will explain how to use the command line tool of OWASP Dependency Check to analyze external dependencies and generate a report based on the known vulnerabilities detected. First, download the command line tool from the official website. At the time of this writing, the latest version is 1.4.3.


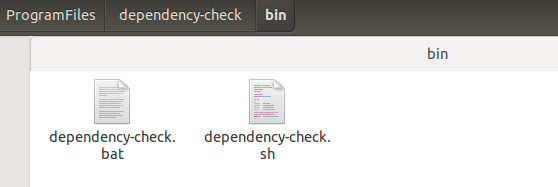
In the bin directory of the dependency-check tool, you can find the executable script. dependency-check.bat file is for running the tool on Windows and the dependency-check.sh file is for running on Linux.

If you just execute the script without providing any parameters, you can see the list of parameters that you need to provide for performing the vulnerability analysis and generating reports.


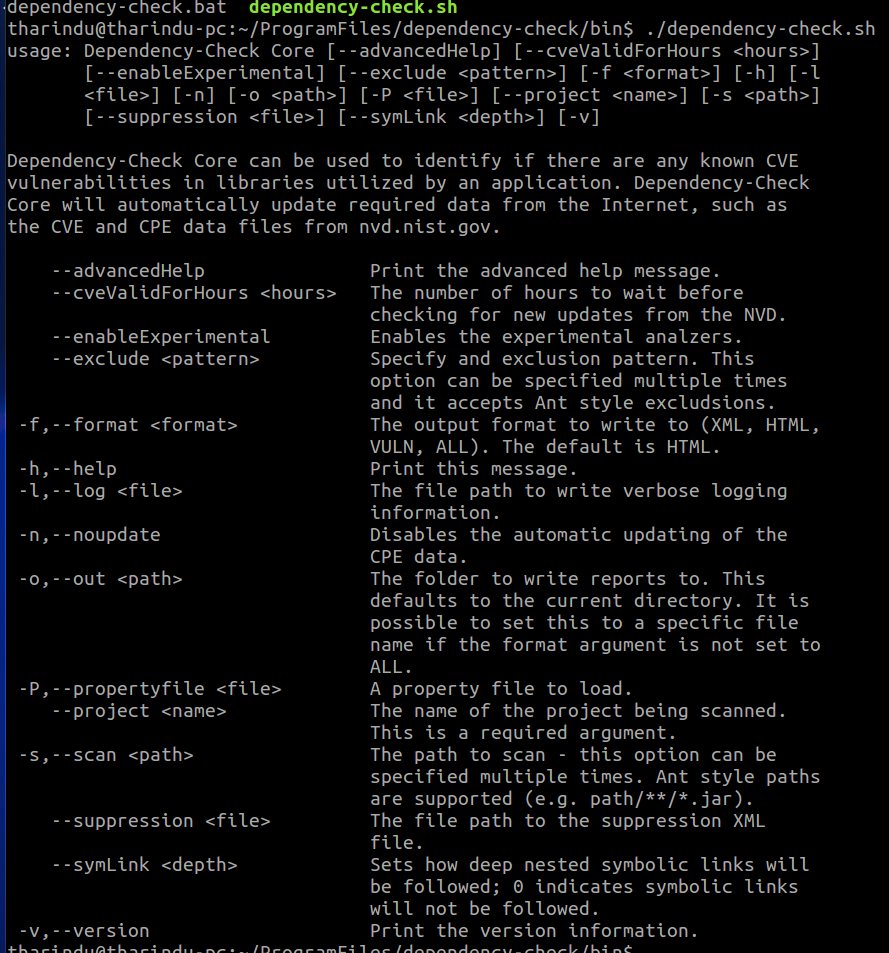
Following are the basic parameters that are required when running a vulnerability analysis.

Parameter
Description
--project
You can specify a name for the project and this would appear in the report
--scan
The folder which contains the 3rd party dependency libraries
--out
The folder where the vulnerability analysis reports should be generated
--suppression
An XML file that contains the known vulnerabilities that should be hidden from the report (false positives)


Now let’s do an analysis using OWASP Dependency Check. First I download  commons-httpclient-3.1 and httpclient-4.5.2 libraries and put them in a folder.

Following is the sample command to run for performing the vulnerability analysis.

./dependency-check.sh  --project "<myproject>" --scan <folder containing 3rd party libraries> --out <folder to generate reports> --suppression <xml file containing suppressions>

Here I skip the suppression and just do the analysis. I have put the above downloaded 2 libraries to /home/tharindu/dependencies/mydependencies folder in my filesystem and I would generate the reports to the /home/tharindu/dependencies/reports folder.

./dependency-check.sh  --project "myproject" --scan /home/tharindu/dependencies/mydependencies --out /home/tharindu/dependencies/reports
When you run the OWASP Dependency Check for the very first time, it would download the known vulnerabilities from the National Vulnerability Database (NVD) and it would maintain these information in a local database. So, when running this for the very first time, it would take some time as it has to download all the vulnerability details.

By default the duration for syncing the local database and NVD is 4 hours. If you have run the Dependency Check within 4 hours, it will just use the data in local database without trying to update the local database with NVD.

Once you run the Dependency Check against the folder where your project dependencies are, it would generate the vulnerability analysis report.


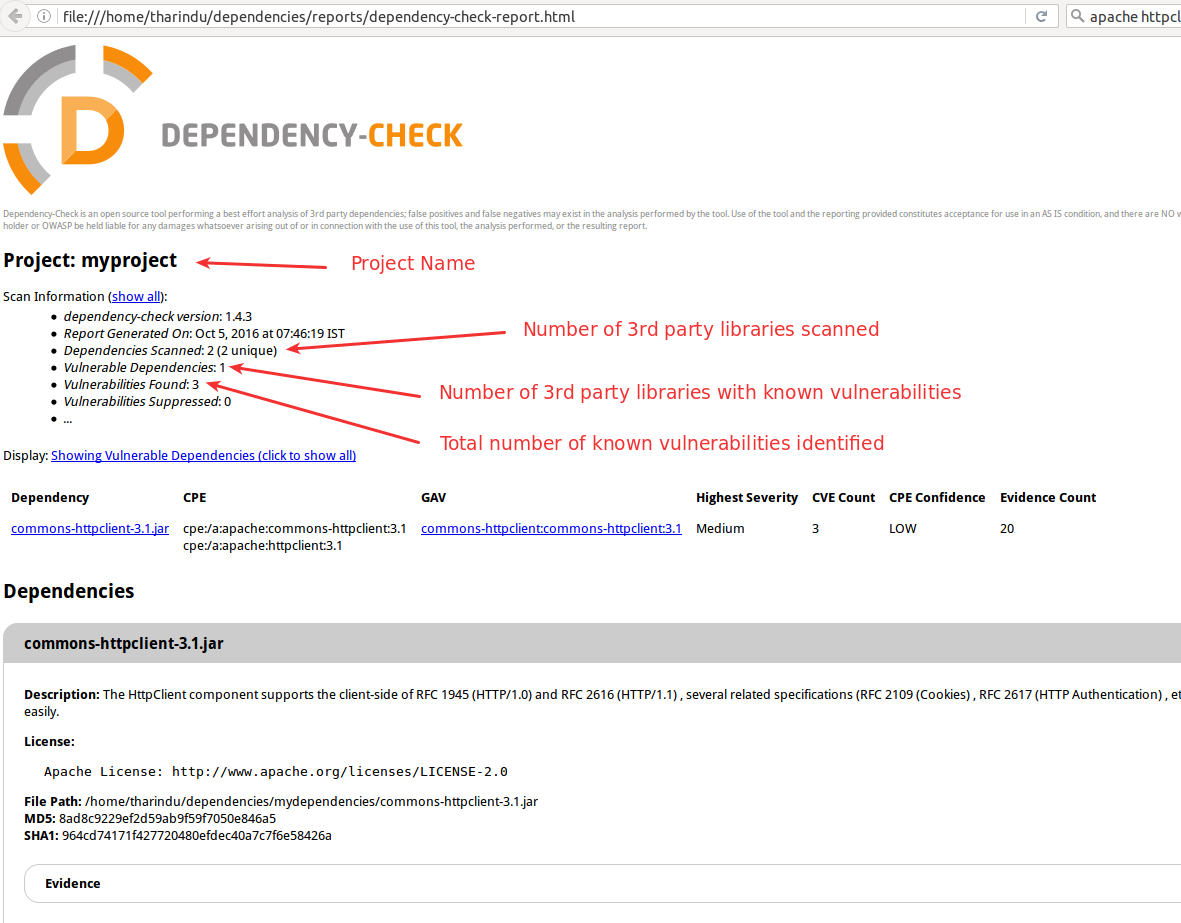
Based on the analysis, I can see that the commons-httpclient-3.1.jar is having 3 known security vulnerabilities, but httpclient-4.5.2.jar is not having any reported security vulnerability.

Following are the 3 known security vulnerabilities reported against commons-httpclient-3.1.jar.


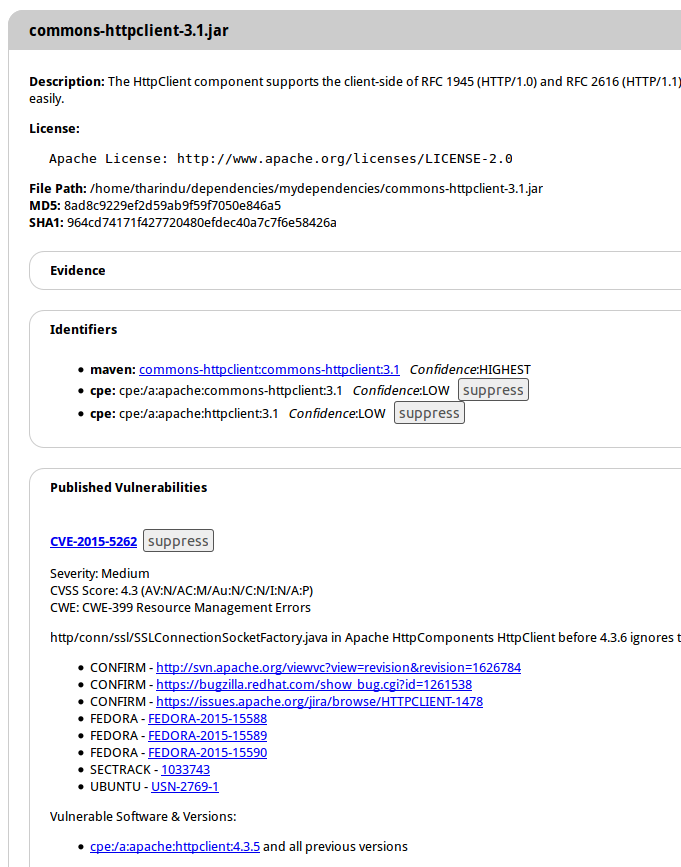
A known security vulnerability would have a unique identification number (CVE [3]) and a score (CVSS [4], a scalo from 0 to 10) and the severity. The severity is decided based on the CVSS score. The identification number follows the format CVE-<reported year>-sequence number.

When we identify that there is a known security vulnerability in a 3rd party library, we can check if that library has a higher version where this issue is fixed. In above example httpclient 3.1’s vulnerabilities are fixed in its latest version.

If the latest version of a 3rd party library is also having known vulnerabilities, you can try to use an alternative which has no reported vulnerabilities so you can make sure your project is not dependent on any external library that is not safe to use.

However there comes situations where you have no option other than using a particular 3rd party library, but still that library has some known vulnerabilities. In such case, you can go through each vulnerability and check if it has any impact to your project. For example, the 3 known issues in httpclient 3.1 are related to SSL, hostname and certificate validation. Let’s say your project uses this library just to call some URL (API) via HTTP (not HTTPS), then your project has no impact from the reported vulnerabilities of httpclient. So these issues become false positives in your case.

In such situation, you might need to get a vulnerability analysis report for 3rd party dependencies that clearly reflects the actual vulnerabilities and hides false positives. Then you can use the suppress option in Dependency Check.

When you get the Dependency Check report, next to each vulnerability in the report, there is a button named suppress. If you want to hide that vulnerability from the report, click on this button and it would popup a message that contains some XML content.


You can create an XML file with below content and put the XML content you got by clicking on the suppress button as child elements under <suppressions> tag.
<?xml version="1.0" encoding="UTF-8"?>
<suppressions xmlns="https://www.owasp.org/index.php/OWASP_Dependency_Check_Suppression">

<!-- add each vulnerability suppression here-->

</suppressions>

A sample is below.


<?xml version="1.0" encoding="UTF-8"?>
<suppressions xmlns="https://www.owasp.org/index.php/OWASP_Dependency_Check_Suppression">
  <suppress>
     <notes><![CDATA[file name: commons-httpclient-3.1.jar]]></notes>
     <sha1>964cd74171f427720480efdec40a7c7f6e58426a</sha1>
     <cve>CVE-2015-5262</cve>
  </suppress>
</suppressions>

Then you can run the Dependency Check again with the --suppression parameter where you provide the file path to the XML file that contains the suppressions.

./dependency-check.sh  --project "myproject" --scan /home/tharindu/dependencies/mydependencies --out /home/tharindu/dependencies/reports --suppression /home/tharindu/dependencies/suppress.xml

Then the report would show how many vulnerabilities are suppressed.

Also the report would contain a new section called Suppressed Vulnerabilities and you can make this section hidden or visible in the report.

In conclusion, before using an external library as a dependency for your project, it is important to know those are safe to use. You can simply use a tool like OWASP Dependency Check and do a vulnerability analysis for the 3rd party dependencies. You can follow this as a process in your organization to ensure that you do not use components with known vulnerabilities in your projects. This is one major software security risk listed under OWASP Top 10 [5] as well.

References

Tharindu Edirisinghe
Platform Security Team
WSO2

Friday, September 2, 2016

SAML Multi Valued Attributes in WSO2 Servers - Retrieving Role Claim of Users as a Single or Multi Valued attribute

In my previous article [1], I explained how to retrieve user claims [2] in the SAML response when a relying party application uses SAML authentication with WSO2 Identity Server.  In this article, I am explaining the Single and Multi Valued attributes in SAML protocol and how to deal with them in WSO2 servers.

In the SAML authentication flow, the Identity Provider sends the SAML response to the relying party upon successful authentication. In order to identify the logged in user, the Subject of the SAML assertion can be used by the relying party. If the relying party needs to know more information about the logged in user (first name, last name, roles etc.), Identity Provider can include those attributes in the SAML AttributeStatement in the assertion.

There are user attributes with single values and also multiple values. For example, the lastname of a user would be a single value which would be represented as given below in the SAML response.

<saml2:Attribute Name="lastname">
    <saml2:AttributeValue>Edirisinghe</saml2:AttributeValue>
</saml2:Attribute>

A a user may have multiple roles granted.

Therefore, in the SAML response  can be included as following.

<saml2:Attribute Name="role">
    <saml2:AttributeValue>admin</saml2:AttributeValue>
    <saml2:AttributeValue>developer</saml2:AttributeValue>
    <saml2:AttributeValue>manager</saml2:AttributeValue>
    <saml2:AttributeValue>Internal/everyone</saml2:AttributeValue>
</saml2:Attribute>

Now since you know the difference between single and multi valued attributes, let’s see how it is used for the role claim of WSO2 Identity Server.

In WSO2 Identity Server 5.0.0 version, by default all the user roles were sent in a single value attribute as shown below where the roles were separated by a comma (,).

<saml2:Attribute Name="http://wso2.org/claims/role" NameFormat="urn:oasis:names:tc:SAML:2.0:attrname-format:basic">
   <saml2:AttributeValue xmlns:xsi="http://www.w3.org/2001/XMLSchema-instance" xsi:type="xs:string">
      admin,Internal/everyone,manager,tester
    </saml2:AttributeValue>
</saml2:Attribute>

When comes to WSO2 Identity Server 5.1.0, this behavior is changed where, by default the roles are treated as a multi valued attribute as given below.

<saml2:Attribute Name="http://wso2.org/claims/role" NameFormat="urn:oasis:names:tc:SAML:2.0:attrname-format:basic">
   <saml2:AttributeValue xmlns:xsi="http://www.w3.org/2001/XMLSchema-instance" xsi:type="xs:string">
      admin
   </saml2:AttributeValue>
   <saml2:AttributeValue xmlns:xsi="http://www.w3.org/2001/XMLSchema-instance" xsi:type="xs:string">
      Internal/everyone
   </saml2:AttributeValue>
   <saml2:AttributeValue xmlns:xsi="http://www.w3.org/2001/XMLSchema-instance" xsi:type="xs:string">
              manager
   </saml2:AttributeValue>
   <saml2:AttributeValue xmlns:xsi="http://www.w3.org/2001/XMLSchema-instance" xsi:type="xs:string">
              tester
   </saml2:AttributeValue>
</saml2:Attribute>


If you had been using Identity Server 5.0.0 and migrate it to the 5.1.0 version, the relying party would not be able to identify the role claim properly, when processing the SAML response sent by the Identity Server.

In that case, you can achieve the same behavior where to retrieve all user roles in a single valued attribute. This is can be done through a property.

You need to add the property MultiAttributeSeparator in the userstore configuration where the user is in. If the user is in the PRIMARY userstore, you need to configure this in SERVER_HOME/repository/conf/user-mgt.xml file under the particular userstore configuration. If the user is located in a secondary userstore [3], you need to add the property in the particular configuration file located in SERVER_HOME/repository/deployment/server/userstores directory.

Role claim in a Multi Valued attribute
<Property name="MultiAttributeSeparator">,</Property>
Role claim in a Single Valued attribute
<Property name="MultiAttributeSeparator">,,</Property>

This question was raised in Stack Overflow [4] and I hope this article would be useful for those who face the same problem.

References


Tharindu Edirisinghe
Platform Security Team
WSO2

Thursday, August 25, 2016

Retrieving User Claims in SAML Response with Service Provider Claim Configuration in WSO2 Identity Server

WSO2 Identity Server supports SAML authentication and Single Sign On capabilities where it can be used as the Identity Provider for a relying party application (Service Provider). A user would visit the relying party website and when he tries to login, the user would be redirected to the Identity Provider web site. There, the user can login and upon successful authentication, the Identity Provider would send the SAML authentication response to the relying party application. The steps of this authentication flow are given in the diagram below.
samlflow.png

The relying party application can read the SAML response sent by the Identity Provider, process it and get to know the authentication status of the user. If the relying party application needs to know user’s attributes (claims) such as first name, last name… the Identity Provider can include those user claims in the SAML response to be read by the relying party application.

In this article, I am demonstrating how to configure WSO2 Identity Server to send user claims in SAML response. You can refer [1] to know more about user claims in WSO2 servers.

In the SAML configuration of the Service Provider configuration in WSO2 server, you have to make sure the following two checkboxes are selected so that the WSO2 server can include user claims in the SAML response.

Enable Attribute Profile
Include Attributes in the Response Always


Next step is to configure the claim mappings inside the Service Provider configuration in WSO2 server. This has two scenarios which are discussed below.

Service Provider has no specific attribute names for claims

WSO2 servers use a common pattern to identify user claims. The claims of a user in a WSO2 server would follow the pattern http://wso2.org/claims/<claim _name>. For example, the email address claim of a user in WSO2 server would be http://wso2.org/claims/emailaddress.

If the relying party application has no specific names for claims, WSO2 server can just include the user claims with the same claim names in SAML response. When reading the SAML response, the relying party application has to process the SAML response and read the claims using the same claim names that WSO2 servers use. Following diagram explains this scenario.


To configure this, go to the Claim Configuration section of the Service Provider configuration in WSO2 server and select the Use Local Claim Dialect option. Then, add the claims that should be included the the SAML response. The subject of the SAML assertion can be set separately by selecting a particular user claim in the configuration.


Then, when the user gets authenticated to the WSO2 server, it will include these claims in the AttributeStatement section of the SAML response. A sample is given below where user claim attributes are highlighted.  


<saml2:AttributeStatement>
   <saml2:Attribute Name="http://wso2.org/claims/im"
                            NameFormat="urn:oasis:names:tc:SAML:2.0:attrname-format:basic"
                            >
      <saml2:AttributeValue
          xmlns:xsi="http://www.w3.org/2001/XMLSchema-instance"
                                     xsi:type="xs:string"
                                     >thariyarox
      </saml2:AttributeValue>
   </saml2:Attribute>
   <saml2:Attribute Name="http://wso2.org/claims/streetaddress"
                            NameFormat="urn:oasis:names:tc:SAML:2.0:attrname-format:basic"
                            >
      <saml2:AttributeValue
          xmlns:xsi="http://www.w3.org/2001/XMLSchema-instance"
                                     xsi:type="xs:string"
                                     >Colombo
      </saml2:AttributeValue>
   </saml2:Attribute>
   <saml2:Attribute Name="http://wso2.org/claims/country"
                            NameFormat="urn:oasis:names:tc:SAML:2.0:attrname-format:basic"
                            >
      <saml2:AttributeValue
          xmlns:xsi="http://www.w3.org/2001/XMLSchema-instance"
                                     xsi:type="xs:string"
                                     >Sri Lanka
      </saml2:AttributeValue>
   </saml2:Attribute>
   <saml2:Attribute Name="http://wso2.org/claims/lastname"
                            NameFormat="urn:oasis:names:tc:SAML:2.0:attrname-format:basic"
                            >
      <saml2:AttributeValue
          xmlns:xsi="http://www.w3.org/2001/XMLSchema-instance"
                                     xsi:type="xs:string"
                                     >Edirisinghe
      </saml2:AttributeValue>
   </saml2:Attribute>
   <saml2:Attribute Name="http://wso2.org/claims/emailaddress"
                            NameFormat="urn:oasis:names:tc:SAML:2.0:attrname-format:basic"
                            >
      <saml2:AttributeValue
          xmlns:xsi="http://www.w3.org/2001/XMLSchema-instance"
                                     xsi:type="xs:string"
                                     >[email protected]
      </saml2:AttributeValue>
   </saml2:Attribute>
   <saml2:Attribute Name="http://wso2.org/claims/url"
                            NameFormat="urn:oasis:names:tc:SAML:2.0:attrname-format:basic"
                            >
      <saml2:AttributeValue
          xmlns:xsi="http://www.w3.org/2001/XMLSchema-instance"
                                     xsi:type="xs:string"
                                     >http://tharindue.blogspot.com
      </saml2:AttributeValue>
   </saml2:Attribute>
   <saml2:Attribute Name="http://wso2.org/claims/givenname"
                            NameFormat="urn:oasis:names:tc:SAML:2.0:attrname-format:basic"
                            >
      <saml2:AttributeValue
          xmlns:xsi="http://www.w3.org/2001/XMLSchema-instance"
                                     xsi:type="xs:string"
                                     >Tharindu
      </saml2:AttributeValue>
   </saml2:Attribute>
   <saml2:Attribute Name="http://wso2.org/claims/organization"
                            NameFormat="urn:oasis:names:tc:SAML:2.0:attrname-format:basic"
                            >
      <saml2:AttributeValue
          xmlns:xsi="http://www.w3.org/2001/XMLSchema-instance"
                                     xsi:type="xs:string"
                                     >WSO2
      </saml2:AttributeValue>
   </saml2:Attribute>
</saml2:AttributeStatement>

Then in the relying party application, it has to process this response and read the claims by their attribute names for identifying the user. A sample image is shown below where the travelocity sample SAML relying party application [2] reads these claims and displays for the authenticated user.


Service Provider has specific attribute names for claims

In most of the usecases, the relying party application (Service Provider) would have its own attribute names for user claims. In such cases, no matter how the Identity Provider maintains its own attribute names for claims, it has to transform them to match with the relying party application’s user claims. An example is, in WSO2 servers, the attribute name for email address of a user is http://wso2.org/claims/emailaddress whereas in a relying party application, it would just be email. Following diagram shows an example for such claim transformation.


In a scenario like this, you need to sent the Claim Configuration inside the Service Provider configuration of WSO2 server as shown below.

We have to select the Define Custom Claim Dialect option and add entries for each user claim that you need to receive in the SAML response.


Local Claim is how WSO2 server knows a particular user claim and the Service Provider Claim is the attribute name that the relying party uses for identifying the particular claim. You have to select the Requested Claim check box as well for a claim to be included in the response. Out of the claims you have added, you can select a particular claim as the Subject Claim URI that would be set as the subject of the assertion.

Following is a sample AttributeStatement in the SAML response for above scenario where Identity Provider (WSO2 IS) has transformed its claim names to match with the claim names of the relying party, so that the relying party application can read and understand each claim of the user.


<saml2:AttributeStatement>
   <saml2:Attribute Name="first_name"
                            NameFormat="urn:oasis:names:tc:SAML:2.0:attrname-format:basic"
                            >
      <saml2:AttributeValue
          xmlns:xsi="http://www.w3.org/2001/XMLSchema-instance"
                                     xsi:type="xs:string"
                                     >Tharindu
      </saml2:AttributeValue>
   </saml2:Attribute>
   <saml2:Attribute Name="address"
                            NameFormat="urn:oasis:names:tc:SAML:2.0:attrname-format:basic"
                            >
      <saml2:AttributeValue
          xmlns:xsi="http://www.w3.org/2001/XMLSchema-instance"
                                     xsi:type="xs:string"
                                     >Colombo
      </saml2:AttributeValue>
   </saml2:Attribute>
   <saml2:Attribute Name="website"
                            NameFormat="urn:oasis:names:tc:SAML:2.0:attrname-format:basic"
                            >
      <saml2:AttributeValue
          xmlns:xsi="http://www.w3.org/2001/XMLSchema-instance"
                                     xsi:type="xs:string"
                                     >http://tharindue.blogspot.com
      </saml2:AttributeValue>
   </saml2:Attribute>
   <saml2:Attribute Name="email"
                            NameFormat="urn:oasis:names:tc:SAML:2.0:attrname-format:basic"
                            >
      <saml2:AttributeValue
          xmlns:xsi="http://www.w3.org/2001/XMLSchema-instance"
                                     xsi:type="xs:string"
                                     >[email protected]
      </saml2:AttributeValue>
   </saml2:Attribute>
   <saml2:Attribute Name="company"
                            NameFormat="urn:oasis:names:tc:SAML:2.0:attrname-format:basic"
                            >
      <saml2:AttributeValue
          xmlns:xsi="http://www.w3.org/2001/XMLSchema-instance"
                                     xsi:type="xs:string"
                                     >WSO2
      </saml2:AttributeValue>
   </saml2:Attribute>
   <saml2:Attribute Name="other_name"
                            NameFormat="urn:oasis:names:tc:SAML:2.0:attrname-format:basic"
                            >
      <saml2:AttributeValue
          xmlns:xsi="http://www.w3.org/2001/XMLSchema-instance"
                                     xsi:type="xs:string"
                                     >thariyarox
      </saml2:AttributeValue>
   </saml2:Attribute>
   <saml2:Attribute Name="last_name"
                            NameFormat="urn:oasis:names:tc:SAML:2.0:attrname-format:basic"
                            >
      <saml2:AttributeValue
          xmlns:xsi="http://www.w3.org/2001/XMLSchema-instance"
                                     xsi:type="xs:string"
                                     >Edirisinghe
      </saml2:AttributeValue>
   </saml2:Attribute>
   <saml2:Attribute Name="country"
                            NameFormat="urn:oasis:names:tc:SAML:2.0:attrname-format:basic"
                            >
      <saml2:AttributeValue
          xmlns:xsi="http://www.w3.org/2001/XMLSchema-instance"
                                     xsi:type="xs:string"
                                     >Sri Lanka
      </saml2:AttributeValue>
   </saml2:Attribute>
</saml2:AttributeStatement>

When using travelocity sample SAML relying party application, this is what we get after reading all the user claims.


References


Tharindu Edirisinghe
Platform Security Team
WSO2