Tuesday, September 19, 2017

Using Salesforce as an Identity Provider for WSO2 Identity Server over SAML 2.0 Web SSO


This article provides all the necessary steps to be followed when configuring WSO2 Identity Server to federate user identity with Salesforce.com.

System Architecture and Message Flow


Following diagram shows the important components in this setup and shows the order of the message flow.


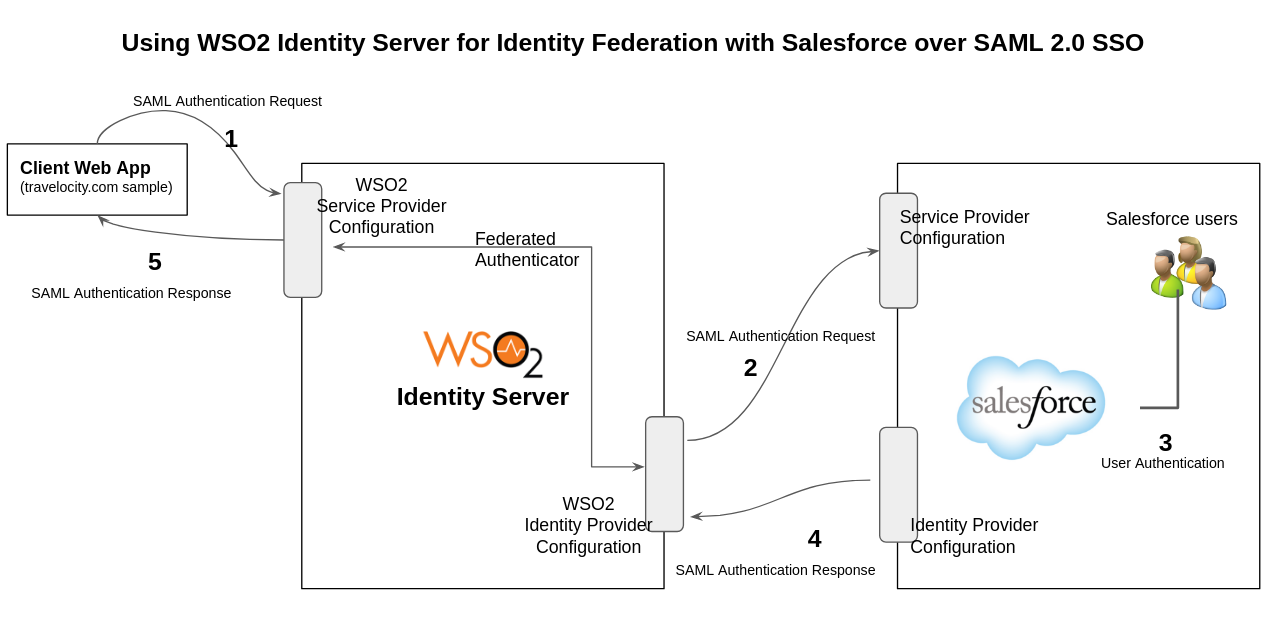
In a high level view, here I have a web application (travelocity.com sample app) that tries to get authenticated with WSO2 Identity Server over SAML 2.0 protocol. When the authentication request comes, Identity Server forwards the request to Salesforce by sending another SAML authentication request. Then, Salesforce prompts the user to login. Here, the end user should have an account created in Salesforce.com. After the user is logged in, Salesforce then sends the SAML response to Identity Server, which contains the SAML assertion that holds the authenticated user’s attributes (claims). Then, WSO2 Identity Server processes the response sent by Salesforce, and generates its own SAML response (claim transformation can be done during the process) and sends it to the client web application. Finally, the client web application processes the received SAML response, identifies the logged in user and completes the authentication process.

Now let’s get started setting up the above environment. First I am configuring the Salesforce, then WSO2 Identity Server and finally, the client web application.

Salesforce Configuration


The following sections below provide all necessary steps to be followed and the configuration to be created in Salesforce side.

Creating a Salesforce Account


If you do not have a Salesforce account yet, visit the Identity Platfrom of Salesforce from https://www.salesforce.com/products/platform/products/identity/  and click on ‘Try for Free’.


Then you need to fill the registration form and submit. After that, login to Salesforce Developer account on https://developer.salesforce.com/ and when it requests your permission to access your profile information, proceed with clicking ‘Allow’.


You might need to fill some additional details about you to continue.


Once above steps are done, you will see the following dashboard. Click on the Settings icon located in the top of the right hand side and then click on ‘Setup’.


Registering a Domain in Salesforce


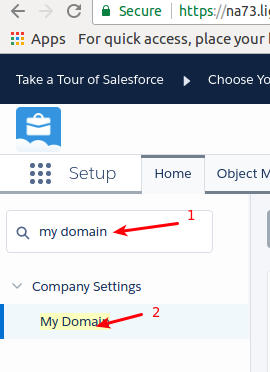
Now, for using Salesforce as an Identity Provider, we need to have a domain registered in Salesforce. For that, in the search text box located in the left menu panel, type ‘my domain’. Then you will see ‘My Domain’ link getting listed under Company Settings. Click on that.


Fill the text box with a suitable domain and register it. The domain will follow the pattern https://<your_domain>.my.salesforce.com.


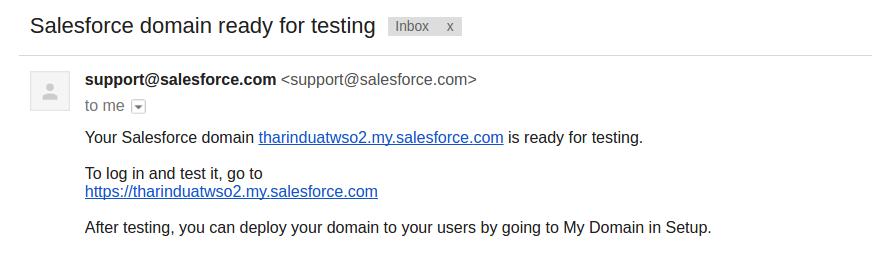
After completing the above steps, it will take around 2 minutes (or couple of more minutes) for Salesforce to publicly make the domain available. Once that is done, you will receive an email.

Creating the Identity Provider Configuration in Salesforce


For Salesforce to act as an Identity Provider, we need to setup an Identity Provider in Salesforce side. For that, in the search textbox in left menu, type ‘identity provider’ and it will suggest you the ‘Identity Provider’ link listed under ‘Identity’ settings. Click on that and then enable the Identity Provider.


Then, you can download the public certificate of this Identity Provider and the Meta Data. You need to keep the downloaded files to be used later, when configuring the Identity Provider in WSO2 Identity Server.


Creating the Service Provider Configuration in Salesforce


Next step is to create the Service Provider in Salesforce side. This is how Salesforce identifies the informing authentication requests and decide how to proceed. Inside the Identity Provider settings, in the Service Providers section, click on the link available for creating the Service Provider.


You can give a name for the Service Provider and fill the required details.


In the ‘Web App Settings’ click on ‘Enable SAML’ checkbox. Then, fill the Entity Id text box with a suitable name. Note that the same name you enter here has to be put in WSO2 Identity Server when creating the Identity Provider configuration in that later.

The ACS URL (Assertion Consumer URL) is the endpoint in WSO2 Identity Server which accepts the response sent by Salesforce. That is https://localhost:9443/commonauth (you can put the IP address if any).

The Issuer is the Domain URL you got from Salesforce after registering your domain.

As the IDP Certificate, you can select the certificate from the dropdown. The SAML responses/assertions will be signed from the same certificate.


Once completing above steps, save the settings and it will show a summary of the service provider configuration.


If you need to edit the Service Provider configuration later, in the left menu, search for ‘apps’ and it will list ‘Manage Connected Apps’ link. From there, you can see the already created applications (Service Provider Configuration is added inside an application) and edit them.


Here is the Application which I created for this usecase which lists all the configuration created.


Here, there are two important URLs to be note which are given below for your reference.


SP-Initiated POST Endpoint
https://tharinduatwso2.my.salesforce.com/idp/endpoint/HttpPost
SP-Initiated Redirect Endpoint
https://tharinduatwso2.my.salesforce.com/idp/endpoint/HttpRedirect


In Salesforce end, there are two different endpoints as above, for HTTP POST binding and HTTP Redirect Binding in SAML protocol. We need to use once appropriately (This is important when setting up the Identity Provider configuration in WSO2 Identity Server later).

Creating a User Profile


Now that the Identity Provider configuration and Service Provider configuration are created in Salesforce side, next step is to create a user profile and bind the application we created above, to that. You can use an already existing profile as you wish without creating a new profile if you wish.


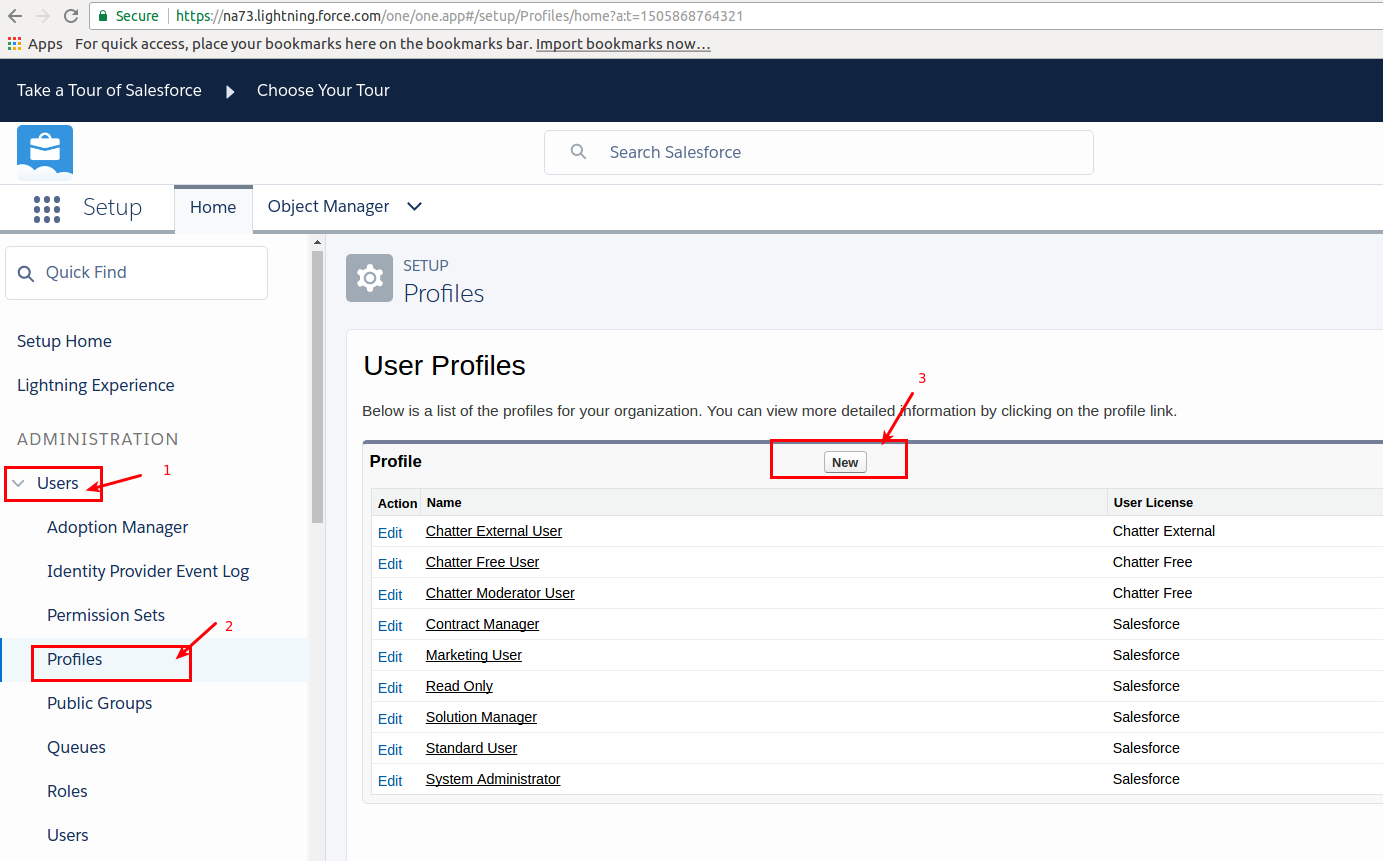
Here, under ADMINISTRATION -> Users, click on Profiles and click on ‘New’ for creating a new profile.


Here I am cloning the existing ‘Standard User’ profile and creating a new profile with the name ‘Identity User’. (you can use any name as per your requirement).


Then I edit the created profile.


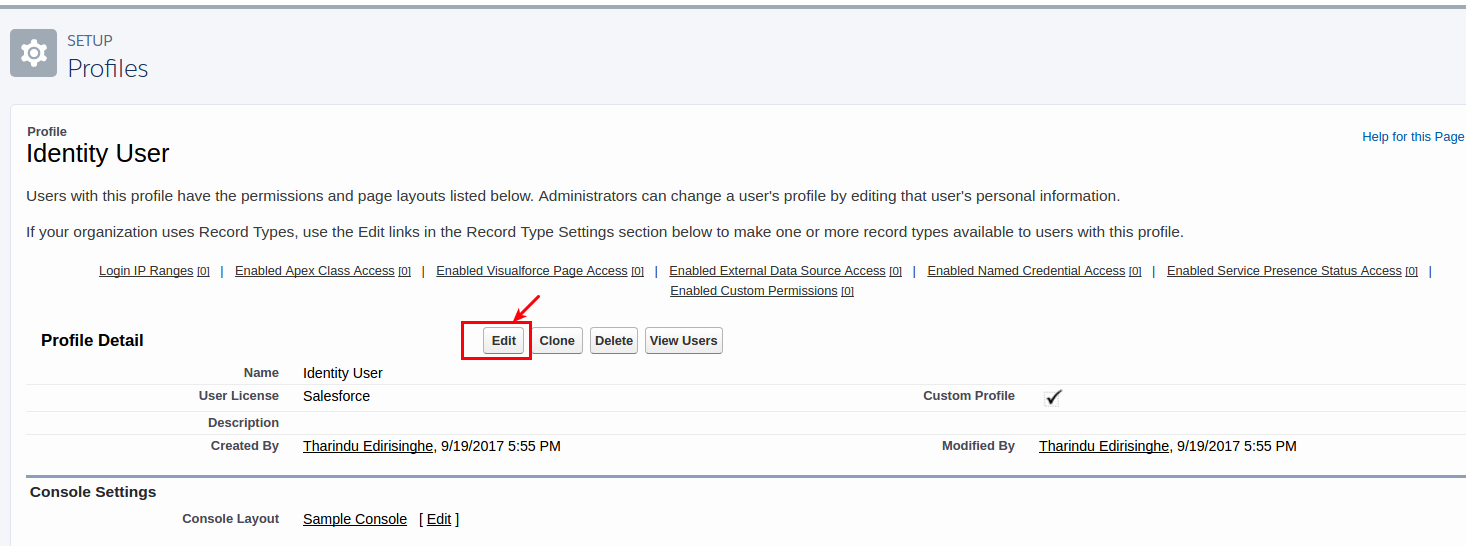
In the Profile configuration, under the ‘Connected App Access’ section, I click on the IdentityServer application and enable it. Here, IdentityServer is the application I created previously when creating the Service Provider configuration.


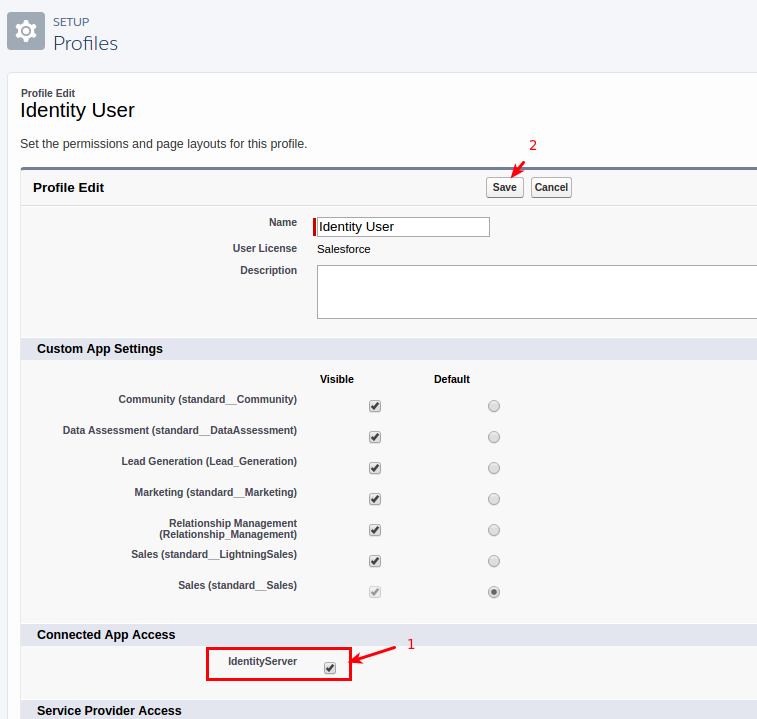
If you are not creating a new user profile, you can edit an existing user profile and enable the application for accessing as above.

Creating a User in Salesforce


Next step is to create a user in Salesforce. This is the user account that we are using when Salesforce prompts for user authentication in the this flow. If you already have users in Salesforce, you can skip creating new users.

In the search textbox in the left menu, search for ‘users’  and it will list the ‘Users’ link. From there, you can create new users.


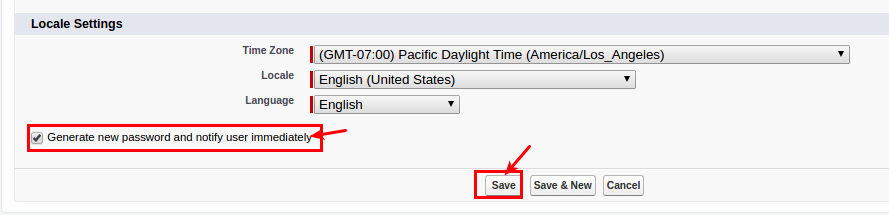
Here I fill the user’s personal information. The important step is the select the user’s profile. The profile you select here must have the application (created previously) enabled for ‘Connected App Access’ as discussed before.


Here I click on ‘Save’ and complete user account creation. (The end user will receive an email for activating the account and resetting password).


With above, we have completed all necessary configuration in Salesforce side.

WSO2 Identity Server Configuration


The following sections below provide all necessary steps to be followed and the configuration to be created in WSO2 Identity Server side. Here I use WSO2 Identity Server 5.3.0 version (latest released GA version by the time of this writing).

Create Identity Provider Configuration


In this step, we create the configuration for letting WSO2 Identity Server know how to talk to Salesforce. Here add an Identity Provider and give the name salesforce.com. You can give any name as you wish.

Then you can give the ‘Identity Provide Public Certificate’ which you downloaded from Salesforce when configuring the Identity Provider in Salesforce. (You can skip this if you are going to create the configuration using SAML Metadata file, which I will explain in the next step).


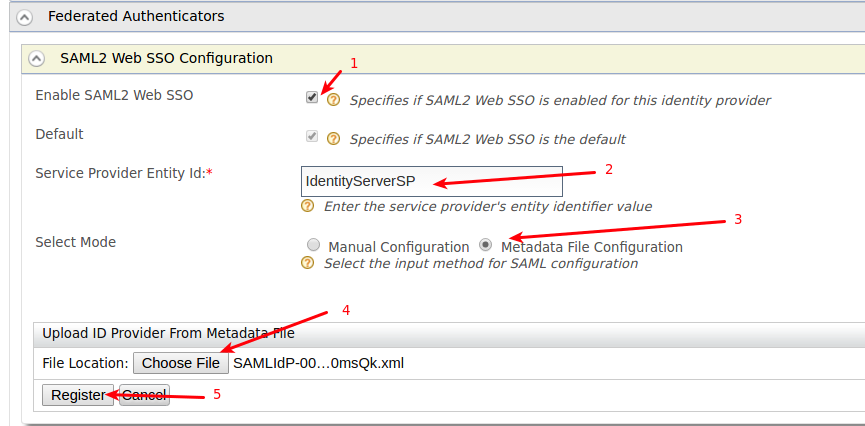
Inside the Identity Provider configuration, expand the Federated Authenticators -> SAML2 Web SSO Configuration.

Click on the ‘Enable SAML2 Web SSO’ checkbox for enabling this SAML authenticator for this Identity Provider configuration.

Provide the Service Provider Entity Id field with the same name you defined in the Salesforce’s Service Provider’s ‘Entity Id’ field.

Then, you can either manually fill all the details and complete the configuration, or you can use the Metadata file downloaded from Salesforce Identity Provider, so it will automatically fill the details for you.

Here I am using the Metadata file downloaded from Salesforce to create the required SAML configuration.


Once you try to register the Identity Provider using the metadata file, it will show this warning. You can continue as we do not have created the configuration already. If you added the Salesforce’s Identity Provider certificate previously, it will be replaced. So, if you are creating the Identity Provider’s SAML configuration from the metadata file, adding the public certificate manually is not required.


Then I can see the required configuration is created. Alternatively you can do the same manually, without using the metadata file.


In above configuration, it is important to define the SSO URL correctly. Because, based on the HTTP Binding you are going to use, the SSO URL in Salesforce differs.

Inside the SAML configuration of the Identity Provider, it has the HTTP Binding radio buttons which you can use as per your requirement.


For HTTP-Redirect Binding, the SSO URL should be,  https://<your_domain>.my.salesforce.com/idp/endpoint/HttpRedirect   

For HTTP-POST Binding, the SSO URL should be,
https://<your_domain>.my.salesforce.com/idp/endpoint/HttpPost


Now that we have created the necessary configuration, click on ‘Update’ and complete the Identity Provider configuration creation in WSO2 Identity Server.

Create the Service Provider Configuration


Next step is to create the Service Provider configuration in WSO2 Identity Server. This is how Identity Server knows how to handle requests from client applications.

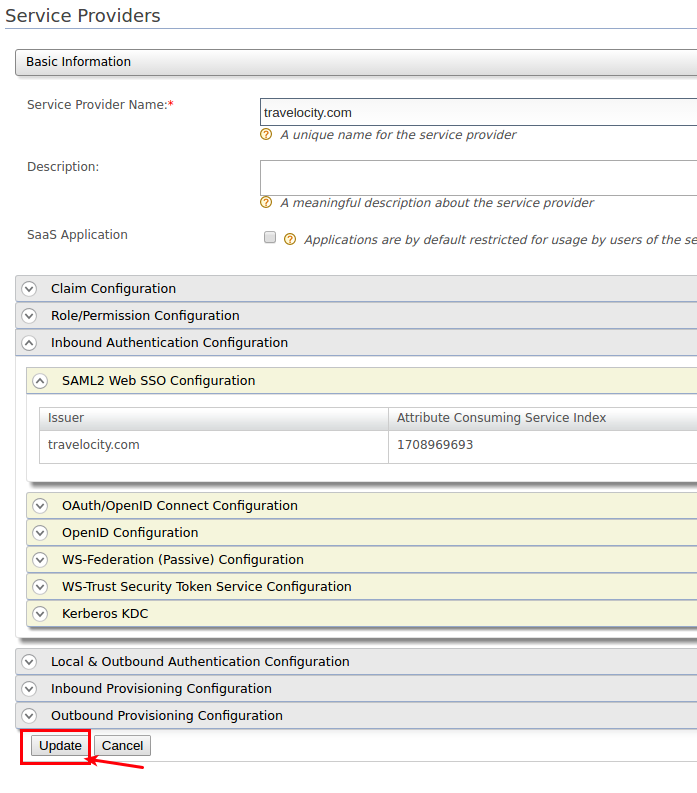
Add a Service Provider. Here I give the name ‘travelocity.com’, because I use the travelocity.com sample web application for this demonstration.


In the Service Provider’s configuration, expand Inbound Authentication Configuration -> SAML2 Web SSO Configuration and click on ‘Configure’.


Then I set the Issuer name to ‘travelocity.com’ and the Assertion Consumer URL to http://localhost:8080/travelocity.com/home.jsp (here I run the travelocity sample app in Tomcat server running on port 8080 of localhost). Once this configuration is set, click on ‘Update’.


We can see that the SAML configuration is created successfully. ‘Update’ the Service Provider configuration with this.
Now, WSO2 Identity Server can accept client web application’s requests over SAML 2.0 protocol. However, we need to redirect the flow to Salesforce, because the end user has to be authenticated with Salesforce. For making this connection work, edit the Service Provider you just created and expand the Local & Outbound Authentication Configuration. Select ‘Federated Authentication’ option and from the dropdown, select the Identity Provider you created previously for Salesforce.


Now we have completed all the configuration in WSO2 Identity Server.

Setting up the Client Web App


Here I use the travelocity.com sample webapp which is a client web application for demonstrating SAML 2.0 authentication flows. You can find the pre-built .war file from

Here I deploy this application (war file) in Apache Tomcat server running on port 8080 in localhost.

I can access the application from the URL http://localhost:8080/travelocity.com/index.jsp.

Testing the Authentication Flow


In the travelocity.com sample client application, I click on the link available for SAML authentication. (You can select either Redirect Binding or POST binding).


Once you click the above link, it makes a SAML authentication Request to WSO2 Identity Server. Then, as we have configured Identity Server to forward the requests to Salesforce, Identity Server will make a SAML authentication request to Salesfofce. Then, Salesforce will prompt its login page and ask the end user to login.

Here I enter the user credentials (this user’s profile is already enabled with the Connected App Access) of the Salesforce user I created previously.


Then, Salesforce will send the SAML response to WSO2 Identity Server which contains the user’s attributes. Finally, Identity Server will generate it’s own SAML response and forward that to the client web application (Claim transformations can be done during the flow).

Finally, the client web application reads the received SAML response and get to know the logged in user and completes the authentication flow.


Written by: Tharindu Edirisinghe, Platform Security Team, WSO2

Thursday, September 14, 2017

Exchanging SAML2 Bearer Tokens with OAuth2 using WSO2 API Manager 2.1.0

In this article I am demonstrating how to exchange a SAML2 assertion to an OAuth2 access token using WSO2 API Manager 2.1.0 version.

You can refer the WSO2 official documentation [1] for more information on the same topic.

Here, I am not using any client application which gets authenticated with WSO2 API Manager with SAML 2.0 protocol, instead I am generating a valid SAML assertion using a command line tool. You can find the download link of this CLI tool in [1].

Once you download the ZIP file of the tool, extract it and navigate to the extracted folder from command line.

Then you need to execute the following command. For descriptions for each parameter, you can [1].


java -jar SAML2AssertionCreator.jar <Identity_Provider_Entity_Id> <NameId value of in the subject of SAML assertion> <Recipient> <Audience> <Identity_Provider_JKS_file> <Identity_Provider_JKS_password> <Identity_Provider_certificate_alias> <Identity_Provider_Private_private_key_password>

So, here’s the command I run that has the values which I use.

java -jar SAML2AssertionCreator.jar localhost admin https://localhost:9443/oauth2/token https://localhost:9443/oauth2/token /home/tharindu/wso2am-2.1.0/repository/resources/security/wso2carbon.jks wso2carbon wso2carbon wso2carbon

In above command, I have added ‘localhost’ for Identity_Provider_Entity_Id. The reason for that is, the default Identity Provider (also known as Resident IDP) in API Manager is ‘localhost’. As the NameId value in the subject of SAML assertion, I have used ‘admin’ because the username I try this scenario against is ‘admin’. For Recipient, I have added https://localhost:9443/oauth2/token which is the OAuth 2 Token Endpoint of API Manager which will receive this SAML assertion once I forward it later. For Audience, I have added the same OAuth 2 Token Endpoint URL of API Manager, because this SAML assertion should be consumed by API Manager for exchanging it to an OAuth 2 token later. Then I have pointed out the wso2carbon.jks file of the API Manager which is the primary keystore of the API Manager. This is the place where the private key will be taken for signing the SAML Assertion that this tool generates. Then I have added the password of this keystore file, which is ‘wso2carbon’ by default. Then, the default certificate alias of WSO2 API Manager is ‘wso2carbon’ and the password of the default private key of API Manager is again ‘wso2carbon’. I have added those values in the command respectively.

Here’s the output I get after running the above command. First it shows the plain XML SAML assertion. After that it shows the URL Encoded value of the Base64 encoded assertion.(added newlines for readability)

Assertion String: <?xml version="1.0" encoding="UTF-8"?><saml:Assertion xmlns:saml="urn:oasis:names:tc:SAML:2.0:assertion" ID="bmnnphkklnpdbkhddabajfegocdknlemffdimbpc" IssueInstant="2017-09-14T21:17:20.305Z" Version="2.0"><saml:Issuer Format="urn:oasis:names:tc:SAML:2.0:nameid-format:entity">localhost</saml:Issuer><ds:Signature xmlns:ds="http://www.w3.org/2000/09/xmldsig#">
<ds:SignedInfo>
<ds:CanonicalizationMethod Algorithm="http://www.w3.org/2001/10/xml-exc-c14n#"/>
<ds:SignatureMethod Algorithm="http://www.w3.org/2000/09/xmldsig#rsa-sha1"/>
<ds:Reference URI="#bmnnphkklnpdbkhddabajfegocdknlemffdimbpc">
<ds:Transforms>
<ds:Transform Algorithm="http://www.w3.org/2000/09/xmldsig#enveloped-signature"/>
<ds:Transform Algorithm="http://www.w3.org/2001/10/xml-exc-c14n#"><ec:InclusiveNamespaces xmlns:ec="http://www.w3.org/2001/10/xml-exc-c14n#" PrefixList="ds saml xs xsi"/></ds:Transform>
</ds:Transforms>
<ds:DigestMethod Algorithm="http://www.w3.org/2000/09/xmldsig#sha1"/>
<ds:DigestValue>OqZVvZeDvEp+sh+XD4t1jBFgY00=</ds:DigestValue>
</ds:Reference>
</ds:SignedInfo>
<ds:SignatureValue>
IQSI8Tt+NBtgpVq1c7q774Nr9NvjCj12HjBW6CAjaD/pJvnf29uQhFEYMZzH5/8f6enyG99ygAJC
hNCLz/BNj2DEZYX9ZniPc+4QhtY4jDrS+0NvAApRV7374cTHjT5L32NkFzu+u37vTqhEyKaWpwGm
bRNXy/MwDjgfxvrZxoU=
</ds:SignatureValue>
<ds:KeyInfo><ds:X509Data><ds:X509Certificate>MIICNTCCAZ6gAwIBAgIES343gjANBgkqhkiG9w0BAQUFADBVMQswCQYDVQQGEwJVUzELMAkGA1UE
CAwCQ0ExFjAUBgNVBAcMDU1vdW50YWluIFZpZXcxDTALBgNVBAoMBFdTTzIxEjAQBgNVBAMMCWxv
Y2FsaG9zdDAeFw0xMDAyMTkwNzAyMjZaFw0zNTAyMTMwNzAyMjZaMFUxCzAJBgNVBAYTAlVTMQsw
CQYDVQQIDAJDQTEWMBQGA1UEBwwNTW91bnRhaW4gVmlldzENMAsGA1UECgwEV1NPMjESMBAGA1UE
AwwJbG9jYWxob3N0MIGfMA0GCSqGSIb3DQEBAQUAA4GNADCBiQKBgQCUp/oV1vWc8/TkQSiAvTou
sMzOM4asB2iltr2QKozni5aVFu818MpOLZIr8LMnTzWllJvvaA5RAAdpbECb+48FjbBe0hseUdN5
HpwvnH/DW8ZccGvk53I6Orq7hLCv1ZHtuOCokghz/ATrhyPq+QktMfXnRS4HrKGJTzxaCcU7OQID
AQABoxIwEDAOBgNVHQ8BAf8EBAMCBPAwDQYJKoZIhvcNAQEFBQADgYEAW5wPR7cr1LAdq+IrR44i
QlRG5ITCZXY9hI0PygLP2rHANh+PYfTmxbuOnykNGyhM6FjFLbW2uZHQTY1jMrPprjOrmyK5sjJR
O4d1DeGHT/YnIjs9JogRKv4XHECwLtIVdAbIdWHEtVZJyMSktcyysFcvuhPQK8Qc/E/Wq8uHSCo=</ds:X509Certificate></ds:X509Data></ds:KeyInfo></ds:Signature><saml:Subject><saml:NameID Format="urn:oasis:names:tc:SAML:1.1:nameid-format:emailAddress">admin</saml:NameID><saml:SubjectConfirmation Method="urn:oasis:names:tc:SAML:2.0:cm:bearer"><saml:SubjectConfirmationData InResponseTo="0" NotOnOrAfter="2017-09-14T21:22:20.305Z" Recipient="https://localhost:9443/oauth2/token"/></saml:SubjectConfirmation></saml:Subject><saml:Conditions NotBefore="2017-09-14T21:17:20.305Z" NotOnOrAfter="2017-09-14T21:22:20.305Z"><saml:AudienceRestriction><saml:Audience>https://localhost:9443/oauth2/token</saml:Audience></saml:AudienceRestriction></saml:Conditions><saml:AuthnStatement AuthnInstant="2017-09-14T21:17:20.353Z"><saml:AuthnContext><saml:AuthnContextClassRef>urn:oasis:names:tc:SAML:2.0:ac:classes:Password</saml:AuthnContextClassRef></saml:AuthnContext></saml:AuthnStatement><saml:AttributeStatement><saml:Attribute><saml:AttributeValue xmlns:xs="http://www.w3.org/2001/XMLSchema" xmlns:xsi="http://www.w3.org/2001/XMLSchema-instance" xsi:type="xs:string">/</saml:AttributeValue></saml:Attribute></saml:AttributeStatement></saml:Assertion>

base64-url Encoded Assertion String: PD94bWwgdmVyc2lvbj0iMS4wIiBlbmNvZGluZz0iVVRGLTgiPz48c2FtbDpBc3NlcnRp
b24geG1s%0AbnM6c2FtbD0idXJuOm9hc2lzOm5hbWVzOnRjOlNBTUw6Mi4wOmFzc2VydGlvbiIgSUQ9ImJtbm5w%0AaGtr
bG5wZGJraGRkYWJhamZlZ29jZGtubGVtZmZkaW1icGMiIElzc3VlSW5zdGFudD0iMjAxNy0w%0AOS0xNFQyMToxNzoyMC4
zMDVaIiBWZXJzaW9uPSIyLjAiPjxzYW1sOklzc3VlciBGb3JtYXQ9InVy%0AbjpvYXNpczpuYW1lczp0YzpTQU1MOjIuMDpuYW1la
WQtZm9ybWF0OmVudGl0eSI%2BbG9jYWxob3N0%0APC9zYW1sOklzc3Vlcj48ZHM6U2lnbmF0dXJlIHhtbG5zOmRzPSJodHRw
Oi8vd3d3LnczLm9yZy8y%0AMDAwLzA5L3htbGRzaWcjIj4KPGRzOlNpZ25lZEluZm8%2BCjxkczpDYW5vbmljYWxpemF0aW9uT
WV0%0AaG9kIEFsZ29yaXRobT0iaHR0cDovL3d3dy53My5vcmcvMjAwMS8xMC94bWwtZXhjLWMxNG4jIi8%2B%0ACjxkczpTaWd
uYXR1cmVNZXRob2QgQWxnb3JpdGhtPSJodHRwOi8vd3d3LnczLm9yZy8yMDAwLzA5%0AL3htbG
RzaWcjcnNhLXNoYTEiLz4KPGRzOlJlZmVyZW5jZSBVUkk9IiNibW5ucGhra2xucGRia2hk%0AZGFiYWpmZWdvY2RrbmxlbW
ZmZGltYnBjIj4KPGRzOlRyYW5zZm9ybXM%2BCjxkczpUcmFuc2Zvcm0g%0AQWxnb3JpdGhtPSJodHRwOi8vd3d3LnczLm9y
Zy8yMDAwLzA5L3htbGRzaWcjZW52ZWxvcGVkLXNp%0AZ25hdHVyZSIvPgo8ZHM6VHJhbnNmb3JtIEFsZ29yaXRobT0iaHR
0cDovL3d3dy53My5vcmcvMjAw%0AMS8xMC94bWwtZXhjLWMxNG4jIj48ZWM6SW5jbHVzaXZlTmFtZXNwYWNlcyB4bWxuczplYz0ia
HR0%0AcDovL3d3dy53My5vcmcvMjAwMS8xMC94bWwtZXhjLWMxNG4jIiBQcmVmaXhMaXN0PSJkcyBzYW1s%0AIHhzIHhzaSIvPjwvZ
HM6VHJhbnNmb3JtPgo8L2RzOlRyYW5zZm9ybXM%2BCjxkczpEaWdlc3RNZXRo%0Ab2QgQWxnb3JpdGhtPSJodHRwOi8vd3d3LnczLm9
yZy8yMDAwLzA5L3htbGRzaWcjc2hhMSIvPgo8%0AZHM6RGlnZXN0VmFsdWU%2BT3FaVnZaZUR2RXArc2grWEQ0dDFqQkZnWTAwPTw
vZHM6RGlnZXN0VmFs%0AdWU%2BCjwvZHM6UmVmZXJlbmNlPgo8L2RzOlNpZ25lZEluZm8%2BCjxkczpTaWduYXR1cmVWYWx1ZT4K%0
ASVFTSThUdCtOQnRncFZxMWM3cTc3NE5yOU52akNqMTJIakJXNkNBamFEL3BKdm5mMjl1UWhGRVlN%0AWnpINS84ZjZlbnlHOTl5Z0FKQ
wpoTkNMei9CTmoyREVaWVg5Wm5pUGMrNFFodFk0akRyUyswTnZB%0AQXBSVjczNzRjVEhqVDVMMzJOa0Z6dSt1Mzd2VHFoRXlLYVdwd0dtC
mJSTlh5L013RGpnZnh2clp4%0Ab1U9CjwvZHM6U2lnbmF0dXJlVmFsdWU%2BCjxkczpLZXlJbmZvPjxkczpYNTA5RGF0YT48ZHM6WDUw%0AOU
NlcnRpZmljYXRlPk1JSUNOVENDQVo2Z0F3SUJBZ0lFUzM0M2dqQU5CZ2txaGtpRzl3MEJBUVVG%0AQURCVk1Rc3dDUVlEVlFRR0V3SlZVekVMTU
FrR0ExVUUKQ0F3Q1EwRXhGakFVQmdOVkJBY01EVTF2%0AZFc1MFlXbHVJRlpwWlhjeERUQUxCZ05WQkFvTUJGZFRUekl4RWpBUUJnTlZCQU1
NQ1d4dgpZMkZz%0AYUc5emREQWVGdzB4TURBeU1Ua3dOekF5TWpaYUZ3MHpOVEF5TV
RNd056QXlNalphTUZVeEN6QUpC%0AZ05WQkFZVEFsVlRNUXN3CkNRWURWUVFJREFKRFFURVdNQlFHQTFVRUJ
3d05UVzkxYm5SaGFXNGdW%0AbWxsZHpFTk1Bc0dBMVVFQ2d3RVYxTlBNakVTTUJBR0ExVUUKQXd3SmJHOWpZV
3hvYjNOME1JR2ZN%0AQTBHQ1NxR1NJYjNEUUVCQVFVQUE0R05BRENCaVFLQmdRQ1VwL29WMXZXYzgvVGtRU2
lBdlRvdQpz%0ATXpPTTRhc0IyaWx0cjJRS296bmk1YVZGdTgxOE1wT0xaSXI4TE1uVHpXbGxKdnZhQTVSQUFkcGJF%
0AQ2IrNDhGamJCZTBoc2VVZE41Ckhwd3ZuSC9EVzhaY2NHdms1M0k2T3JxN2hMQ3YxWkh0dU9Db2tn%0AaHovQVR
yaHlQcStRa3RNZlhuUlM0SHJLR0pUenhhQ2NVN09RSUQKQVFBQm94SXdFREFPQmdOVkhR%0AOEJ
BZjhFQkFNQ0JQQXdEUVlKS29aSWh2Y05BUUVGQlFBRGdZRUFXNXdQUjdjcjFMQWRxK0lyUjQ0%0AaQpRbFJHNUlU
Q1pYWTloSTBQeWdMUDJySEFOaCtQWWZUbXhidU9ueWtOR3loTTZGakZMYlcydVpI%0AUVRZMWpNclBwcmpPcm1
5SzVzakpSCk80ZDFEZUdIVC9ZbklqczlKb2dSS3Y0WEhFQ3dMdElWZEFi%0ASWRXSEV0VlpKeU1Ta3RjeXlzRmN2dWh
QUUs4UWMvRS9XcTh1SFNDbz08L2RzOlg1MDlDZXJ0aWZp%0AY2F0ZT48L2RzOlg1MDlEYXRhPjwvZHM6S2V5SW5
mbz48L2RzOlNpZ25hdHVyZT48c2FtbDpTdWJq%0AZWN0PjxzYW1sOk5hbWVJRCBGb3JtYXQ9InVybjpvYXNpczpuYW
1lczp0YzpTQU1MOjEuMTpuYW1l%0AaWQtZm9ybWF0OmVtYWlsQWRkcmVzcyI%2BYWRtaW48L3NhbWw6TmFtZUlE
PjxzYW1sOlN1YmplY3RD%0Ab25maXJtYXRpb24gTWV0aG9kPSJ1cm46b2FzaXM6bmFtZXM6dGM6U0FNTDoyLjA6Y
206YmVhcmVy%0AIj48c2FtbDpTdWJqZWN0Q29uZmlybWF0aW9uRGF0YSBJblJlc3BvbnNlVG89IjAiIE5vdE9uT3JB%0A
ZnRlcj0iMjAxNy0wOS0xNFQyMToyMjoyMC4zMDVaIiBSZWNpcGllbnQ9Imh0dHBzOi8vbG9jYWxo%0Ab3N0Ojk0NDMvb
2F1dGgyL3Rva2VuIi8%2BPC9zYW1sOlN1YmplY3RDb25maXJtYXRpb24%2BPC9zYW1s%0AOlN1YmplY3Q%2BPHNhb
Ww6Q29uZGl0aW9ucyBOb3RCZWZvcmU9IjIwMTctMDktMTRUMjE6MTc6MjAu%0AMzA1WiIgTm90T25PckFmdGVyPSI
yMDE3LTA5LTE0VDIxOjIyOjIwLjMwNVoiPjxzYW1sOkF1ZGll%0AbmNlUmVzdHJpY3Rpb24%2BPHNhbWw6QXVkaWVuY
2U%2BaHR0cHM6Ly9sb2NhbGhvc3Q6OTQ0My9vYXV0%0AaDIvdG9rZW48L3NhbWw6QXVkaWVuY2U%2BPC9zYW1s
OkF1ZGllbmNlUmVzdHJpY3Rpb24%2BPC9zYW1s%0AOkNvbmRpdGlvbnM%2BPHNhbWw6QXV0aG5TdGF0ZW1lbnQgQXV0aG5JbnN0YW50
PSIyMDE3LTA5LTE0%0AVDIxOjE3OjIwLjM1M1oiPjxzYW1sOkF1dGh
uQ29udGV4dD48c2FtbDpBdXRobkNvbnRleHRDbGFz%0Ac1JlZj51cm46b2FzaXM6bmFtZXM6dGM6U0FNTDoyLjA6YWM6Y2xhc3NlczpQYXNz
d29yZDwvc2Ft%0AbDpBd
XRobkNvbnRleHRDbGFzc1JlZj48L3NhbWw6QXV0aG5Db250ZXh0Pjwvc2FtbDpBdXRoblN0%0AYXRlbWVudD48c2FtbDpBdHRyaWJ1dGVTdGF0
ZW1lbnQ%2BPHNhbWw6QX
R0cmlidXRlPjxzYW1sOkF0%0AdHJpYnV0ZVZhbHVlIHhtbG5zOnhzPSJodHRwOi8vd3d3LnczLm9yZy8yMDAxL1hNTFNjaGVtYSIg%0AeG1sbnM6
eHNpPSJodHRwOi8vd3d3LnczLm9yZy8yMDAxL1hNTFNjaGVtYS1pbnN0YW5jZSIgeHNp%0AOnR5cGU9InhzOnN0cmluZyI%2BLzwvc2FtbDpBd
HRyaWJ1dGVWYWx1ZT48L3NhbWw6QXR0cmlidXRl%0APjwvc2FtbDpBdHRyaWJ1dGVTdGF0ZW1lbnQ%2BPC9zYW1sOkFzc2VydGlvbj4%3D

Now that we have the SAML assertion, next step is to send it to API Manager for exchanging it with an OAuth 2 token.

For that, we need to have a valid credentials (Client ID and Client Secret) of an OAuth App registered in API Manager. Here I am creating a Service Provider in the Management Console of API Manager.


Then in the Service Provider configuration, I configure the OAuth app settings.


Here, the important setting is ‘SAML2’ checkbox, which tells API Manager that this application should support SAML Bearer Grant Type. In the settings, the ‘Callback Url’ is a mandatory field, although it has no use when comes to SAML Bearer Grant Type. It is only useful for Authorization Code Grant Type. But since the textbox is mandatory, I’ll insert a dummy value there and continue.

Now it will show the generated Client ID and Client Secret values which I can use now for exchanging the SAML assertion to an OAuth access token
.

Now that I have all the parameters I need, here I call the Token API URL of WSO2 API Manager, which is https://localhost:8243/token . T

curl -k -d "grant_type=urn:ietf:params:oauth:grant-type:saml2-bearer&assertion=<base64-URL_encoded_assertion>&scope=PRODUCTION" -H "Authorization: Basic <base64_encoded_consumer-key:consumer_secret>" -H "Content-Type: application/x-www-form-urlencoded" https://localhost:8243/token


In the response, we get a JSON message from API Manager, which contains the OAuth 2 access token.

{
  "access_token":"ab80696d-e309-3b0a-994b-a08785fea305",
  "refresh_token":"3263eede-3c8b-3917-9e0b-04f26a96a87f",
  "scope":"default",
  "token_type":"Bearer",
  "expires_in":3600
}

Using this OAuth 2 access token, we can invoke any API hosted in WSO2 API Manager, provided that the particular APIs we call are subscribed by the OAuth app we used here (the app which we took Client ID and Client Secret values).

Error Handling

When you try the above flow, there can be different cases which would go wrong. In such case, enabling the DEBUG logs in the API Manager would help you to isolate the exact issue. For that, add the following two lines to API_Manager/repository/conf/log4j.properties file and restart the server.


log4j.logger.org.wso2.carbon.identity.oauth=DEBUG
log4j.logger.org.wso2.carbon.identity.oauth2=DEBUG

After that if you get an error, you can refer the debug logs to get some clue on the issue.

Most of the time, you would see a common error as following, which doesn’t explain the exact problem.

{"error_description":"Provided Authorization Grant is invalid","error":"invalid_grant"}

One case this flow might break is when the SAML assertion you use is an already expired one.

In the wso2carbon.log of API Manager, following debug log can be seen which explains the issue.

[2017-09-14 15:00:34,612] DEBUG - SAML2BearerGrantHandler NotOnOrAfter is having an expired timestamp in Conditions element

Another case would be when the SAML Issuer name you used to generate the SAML assertion is not known by API Manager. In that case, still you would see the same error as above, but in the DEBUG log it would have following, which explains the issue.

[2017-09-14 15:07:25,024] DEBUG - SAML2BearerGrantHandler SAML Token Issuer : myidp not registered as a local Identity Provider in tenant : carbon.super

Another case when the value you have in the SAML assertion for Audience is not matching with API Manager’s Audience.

[2017-09-14 15:13:08,737] DEBUG - SAML2BearerGrantHandler SAML Assertion Audience Restriction validation failed against the Audience : https://localhost:9443/oauth2/token of Identity Provider : LOCAL in tenant : carbon.super

Another case is when the Recipient you have in the SAML assertion is not matching with the Recipient value of API Manager. That again can be identified using the debug log which is below.

DEBUG - SAML2BearerGrantHandler None of the recipient URLs match against the token endpoint alias : https://localhost:9443/oauth2/token of Identity Provider LOCAL in tenant : carbon.super

Likewise we can use the debug logs to identify most of the issues that would come during this flow.

References


Tharindu Edirisinghe
Platform Security Team
WSO2